Here is the step by step process I used to upgrade my
Mindstor PSS-1820 to 40GB.
NOTE: major update to this doc is coming with
a bootable floppy/CD containing a linux version
to use on any notebook or desktop PC; notebook
will not require the IDE cable adapter.
Mindstor upgrade process - version 0.2, 25-March-2003
Author: Steve Dempsey steved64@cox.net
DISCLAIMER:
Be prepared to take a small risk. This process
worked for me, no guarantee you will get the same
results. And no guarantee you will not damage
something. The mindstor & digital wallet were
not designed
to be serviced by the user. It is very
easy to plug connectors in the wrong way, as not all
cables have a proper key or guide. Always connect
or disconnect drives/cables with the POWER OFF.
If you are not
comfortable with the hardware, use
one of the
upgrade services mentioned on the
digitalwallet
forum. So much for disclaimers.
REPLACING A DAMAGED DRIVE
OR RESTORING CORRUPT FIRMWARE:
The procedure below will work to copy from a
known working drive to another drive of the same
size, however you will need to start with a source
for the firmware. If your system will boot but
cannot read or reformat the storage area due to
failing media, it is possible the firmware area is
still readable and this procedure may work.
If your old drive does not function at all, or you
have lost the firmware, you will need to find
someone else with a similar unit to borrow, or
send your unit to one of the repair/upgrade services.
Please do not ask me to post a copy of the image
file; it is copyrighted software and cannot be shared
freely.
BACKUP:
Before you do anything else, BACK UP YOUR DATA!
If something fails and you corrupt the old drive
contents, at least you should not lose any data
stored on the unit. You probably will not cause
physical damage during this process, but writing
the wrong data will render your drive unusable
in the mindstor until you get a fresh copy of
the firmware.
HARDWARE:
You will need a PC running linux (any version),
a place to plug in an IDE drive (can be master
or slave), and an adapter to convert the usual
40 pin IDE connector to the 44 pin 2.5" notebook
drive type used by the mindstor unit. These
adaptors usually sell for about $5; any decent
PC repair shop or parts supplier will have them
(e.g. Fry's electronics). The adapter looks like this:

Obviously you will also need a WORKING mindstor
unit and a new 2.5" drive, probably larger than the original.
The latest M@W drives were IBM/Hitachi Travelstar
types, which are readily available from many retail
sources.
UPGRADING:
Step 1:
Anesthetize the patient before surgery.
(disconnect the battery).
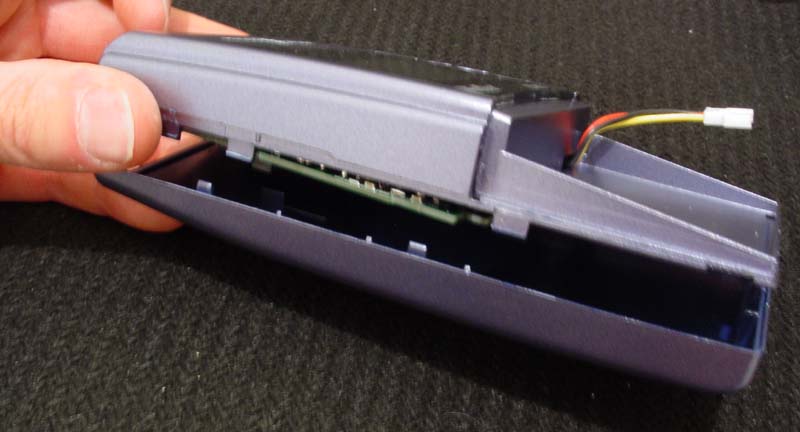
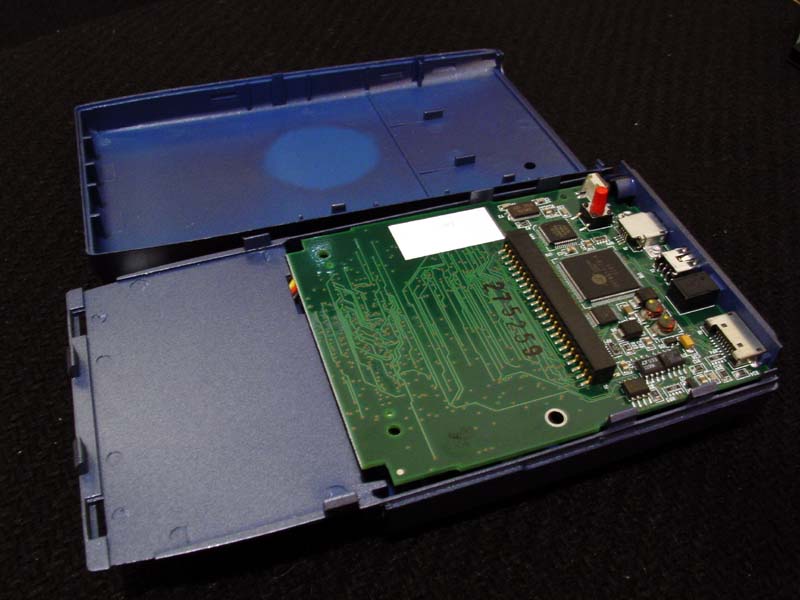
Step 2:
Open the mindstor unit. The case comes
apart by prying gently at the tabs on the
battery compartment end and working around
one or both sides until it opens up. The
case will separate into a front half containing
all the electronics, and the back half as
an empty shell. These pictures should
help:
Step 3:
Remove the old drive by sliding it out in
the same direction as the battery cover opens.
Step 4:
If you need this drive to be a slave in your
PC, install a jumper according to instructions
that are probably printed on the drive label.
Step 5:
With PC powered off, connect the old
mindstor drive.
Step 6:
Power up the PC, check BIOS settings as
needed to verify the drive is visible and
did not conflict with one of your existing
drives (e.g. two masters or two slaves on
same IDE controller).
Step 7:
Boot linux. Explaining how to install
or run linux is way beyond the scope of
these instructions.
Step 8:
Look in your boot log or syslog to verify
the drive showed up. On my redhat system
this is /var/adm/messages, something like:
hdb: IC25N020ATCS04-0, ATA DISK drive
hdb: 39070080 sectors (20004 MB)
You may also find this information
using the 'dmesg' command, e.g.:
# dmesg|grep hd.:
...
hda: IC35L040AVVA07-0, ATA DISK drive
hda: 78156288 sectors (40016 MB) w/1863KiB Cache, CHS=4865/255/63, UDMA(100)
hdb: IC25N020ATCS04-0, ATA DISK drive
hdb: 39070080 sectors (20004 MB)
...
The important part is the number of sectors.
The device name will depend on where you connected
the drive
according to the normal linux ide device order:
hda = primary IDE, master (normally boot disk)
hdb = primary IDE, slave
hdc = secondary IDE, master (normally CDROM)
hdd = secondary IDE, slave
Step 9:
Try to mount the drive (read-only) and see
if your data is visible:
# mkdir /mnt/ms
# mount -r /dev/hdb /mnt/ms
# ls /mnt/ms
m$a$w$.s$n ms000001 test.txt
# umount /mnt/ms
At this point you could optionally create
another backup of the files to later be
restored on the new drive if you have extra
disk space somewhere on one of your linux
filesystems.
Step 10:
Calculate where the firmware is located,
which is 16MB at the end of the drive. For
example:
16MB = 16 * 1024 * (2 sectors/kb) = 32768 sectors
drive size - 16MB offset = firmware location
39070080 - 32768 = 39037312
Step 11:
Use this number to extract the firmware
into a temporary file:
# dd of=/tmp/ms.img if=/dev/hdb skip=39037312 bs=512
32768+0 records in
32768+0 records out
# ls -l /tmp/ms.img
-rw-r--r-- 1 root root 16777216 Mar 23 19:41 /tmp/ms.img
Step 12:
Shutdown linux:
# halt
Disconnect your old drive,
keep in a safe place.
For peace of mind you
may want to reconnect it
once to your mindstor
unit and boot up to verify
it still works.
Don't forget to remove the slave
jumper if you
used one; the mindstor will not
boot with a
slave jumper installed.
Step 13:
Connect your new drive the same way you
had the old one and bring up linux. Check
its size in the boot log or using the dmesg
command, should be something like:
hdb: IC25N040ATCS05-0, ATA DISK drive
hdb: 78140160 sectors (40008 MB)
Step 14:
Calculate where to place the firmware
image, e.g.:
78140160 - 32768 = 78107392
Step 15:
Write the firmware:
# dd if=/tmp/ms.img of=/dev/hdb seek=78107392 bs=512
Step 16:
Build the fat32 filesystem at the base
of the drive, using everything except the top
16MB. DO NOT USE FDISK. The mindstor does
not use the normal PC filesystem layout, does
NOT have a boot sector containing the partition
map. The fat32 filesystem begins at sector 0.
The mkdosfs utility can do this, but it takes
1K blocks instead of 512byte sectors, so divide
the above number by 2.
78107392 / 2 = 39053696
Note: if you miscalculate this number, mkdosfs will
still try to create a valid fat32 filesystem. A smaller
number will not use the full disk capacity. A larger
number may cause mkdosfs to corrupt the firmware
area.
# mkdosfs -I -F 32 -v /dev/hdb 39053696
mkdosfs 2.8 (28 Feb 2001)
Warning: block count mismatch: found 39070080 but assuming 39053696.
/dev/hdb has 255 heads and 63 sectors per track,
logical sector size is 512,
using 0xf8 media descriptor, with 78107392 sectors;
file system has 2 32-bit FATs and 8 sectors per cluster.
FAT size is 76129 sectors, and provides 9744387 clusters.
Volume ID is 3e828478, no volume label.
#
Step 17:
Shutdown linux, disconnect the new drive.
# halt
Step 18:
Remove slave jumper if any, connect new drive
to the mindstor unit.
Step 19:
If the new drive works, reassemble your case,
restore data if you want (you did make backups,
right??), and celebrate!
Step 20:
If this procedure works for you, I would like to hear other
success stories. If you find errors in the process, please
contact me steved64@cox.net so I can
correct or improve
the document.
For a short time I am willing to collect and document known combinations
of DW/MS units and drive types that are proven to work. If you
have success using something NOT listed here, please let me know.
If you find a combination that fails, that might also be good to know
so others don't waste their time trying.
| Storage unit type |
Original drive |
Upgrade drive |
pass/fail, notes |
| PSS-1705 |
|
|
|
| PSS-1820 |
IBM/Hitachi Travelstar 20GB
IC25N020ATCS04 |
IBM/Hitachi Travelstar 20GB
IC25N020ATCS04 |
pass (identical replacement) |
| |
|
IBM/Hitachi Travelstar 40GB
IC25N040ATCS05 |
pass |
| PSS-1830 |
|
|
|