With my new computer, a Mac Studio, comes with a 10G ethernet port instead of the standard 1G (1000MB/s). Since a lot of the work that I do is dealing with tons of photography image files off the NAS, I thought it’d be fun to see if I could get the NAS to also get those same 10G speeds, to give me super fast connectivity between the two.
I actually tried this a few months ago when I found out that the Synology supported the 802.3ad link aggregation.
Basically it has 4 ethernet ports and you can connect all 4 of them to a switch that supports that same protocol Now you have 4x1000MB/s. I got a cheap managed switch that supports 802.3ad protocol and set it up. After a couple of tries, I got it working! Four connections into the switch using the link aggregation and boom!
Oh wait…. to actually use that new 4000MB/s I have to have that on the other side (my computer) as well. Which on my iMac, I don’t. So I shelved it and returned (well, tried to return) the switch because the project kinda died on me 🙁
With the new Mac Studio it has a 10G port already, so suddenly the possibility is back. Also, I found out that my NAS (the Synology DS1821+) has the option of a separate 10G add on card. At first I thought that the fact I had the NVME SSD cards in already were on an add on card, and I had to make the choice of:
- 10G add on card that worked with my model
- NVME SSD that worked with my model
- 10G plus NVME that didn’t work with my model
A quick email to Synology and they pointed out that the NVME on my model is built in and not on an additional add on card (duh).
So I got the E10G18-T1 add on card from Synology and the cheapest 10G managed switch I could find and they arrived yesterday.
To get it working was pretty simple.
You just need to unscrew the 6 screws holding the top of the Synology case on and pull it off. Then unscrew the little bit covering the PCI add on card area and put the card in there. Put the lid back on, screw it back on and plug things in and turn it back on.
The switch was easy, just plugged it and swapped all the cables from the old switch over. Without needing to do any sort of fancy configuration it just acts as a hub really, nothing is needed.
Looking at the UI it registered and showed up as 10000G immediately.
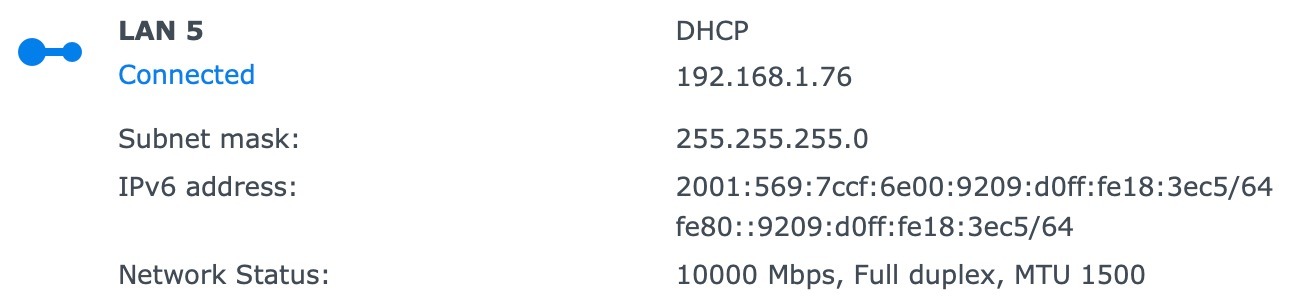
From there I plugged it in and set it to DHCP temporarily and it pulled an IP properly and showed it as 10G.
The fun stuff is next…
For my own setup, my computer is in a temporary location and there is a cable from the office (where the switch is) to the room where I am. Unfortunately I have two computers in there so I have to have a switch there that’s not 10G.
NAS 10G <—> 10G switch <—> 1G switch <--—> Mac Studio
                                       \-> iMac
However, unplugging the switch and connecting the computer directly to the wall means I now had this setup:
NAS 10G <—> 10G switch <—> Mac Studio
This gives a direct line from the 10G port on the Mac Studio to the 10G port on the NAS through a 10G switch.
Ho-ly-crapola.
Before a test the speed to copy a 10G test file took about 1 minute.
After it took about 10 seconds, with speeds peaking at over 800MB/s transfer rate.
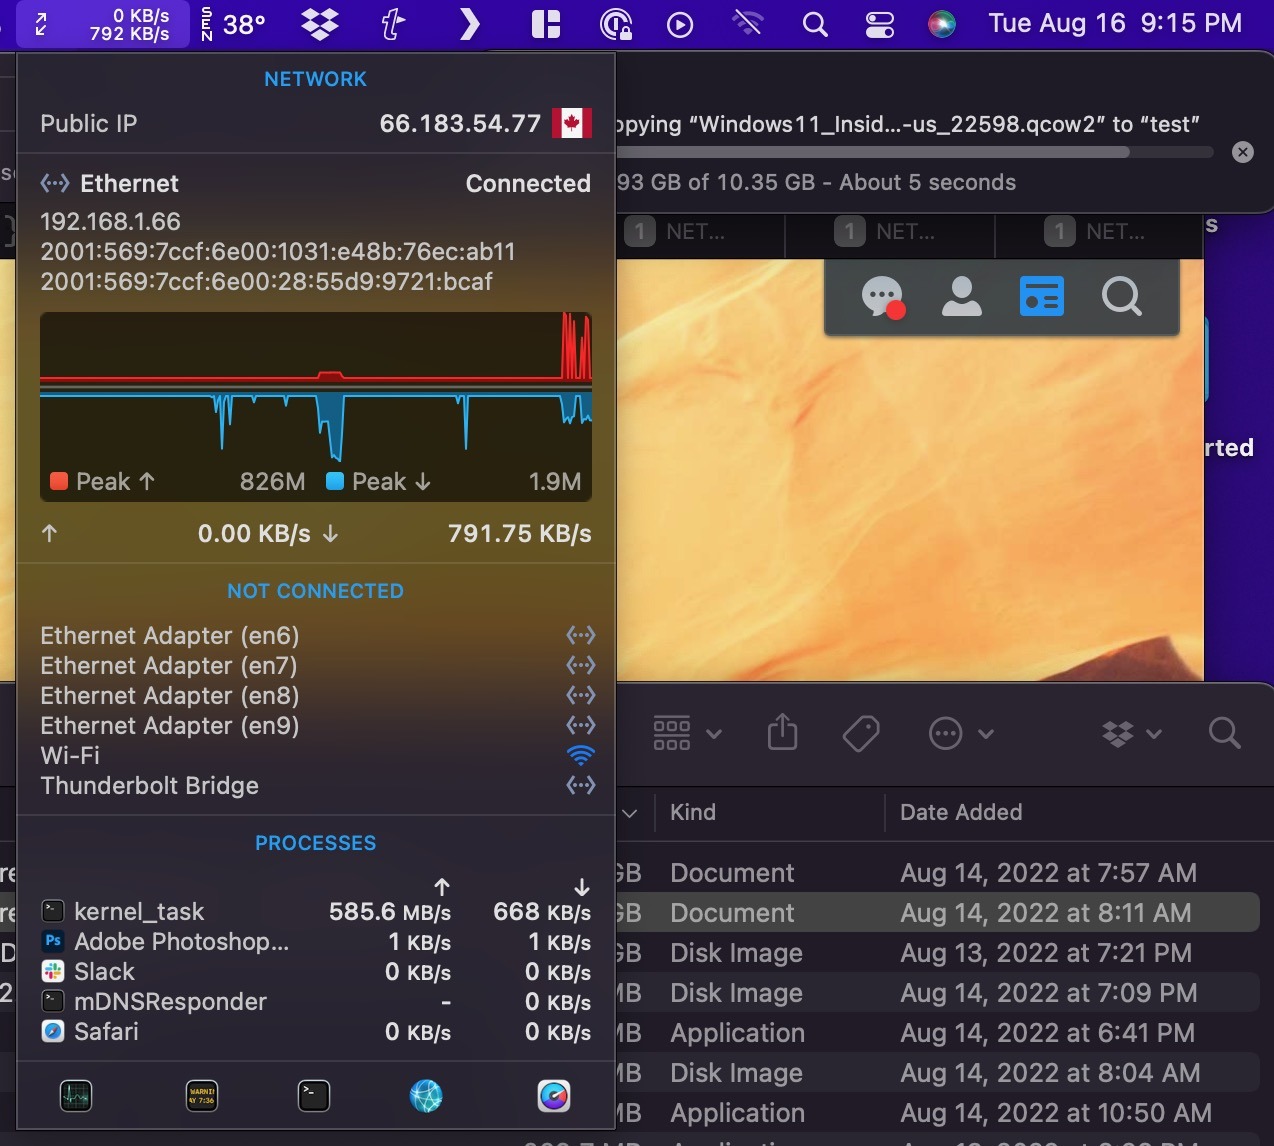
Of course, this makes sense. 10x the bandwidth means 10x the speed.
Now…
- Will it work as quickly with working with photo files off the NAS? Maybe.
- Is the SSD cache for the large file helping? Probably.
- Will it work as well with small files vs big file? Who knows.
- Am I impressed that it’s getting 10x coming off a RAID array when I thought the disk speed would be a bottleneck? Hell yea.
As soon as the office is put back together I’ll get the Mac Studio right next to the switch, this will be full time. Until then I’ve had to unplug the direct connection and have the 1G switch in between.
Of course, getting larger disk space on the Mac Studio means that there’s now less need to work off the network, but it’s still a nice fun diversion.